Collaborate with Issues
Issues are a critical tool to facilitate effective collaboration, allowing project team members to share important project files (Collections), provide direction on critical and time-sensitive decisions, record the back-and-forth interactions that support approvals, and authorize internal and external team members to use them. Here’s how to start to collaborate with Issues.
What is an Issue
A project Issue is an important tool for project team members to collaborate by:
- Sharing files (as Collections) with specific authorization of use;
- Soliciting and capturing information related to a specific design or construction topic or question;
- Recording approvals at all stages of the process;
- Sharing important direction to outside team members when it requires an acknowledgment of receipt;
- Capturing communication internally and externally in one place in a digestible and searchable project history;
- Request the signature of another design professional with a specific set of project information.
Creating an Issue
Select the Issues tab in your Project in the blue shaded headings banner at the top of the page. This will take you to the main Issues page for that Project. A short text description will display describing the Issue types if no Issues exist.
The Issues page consists of a table of all the Issues for the project with a search bar to locate Issues no matter their status, and filter functions to tailor the view to fit your needs. Projects with Phases active will display Issues assigned to those Phases, otherwise, they will display under “No Phase”. (See Here for information on creating Phases.) You can edit Issues to add the appropriate project Phase at any time.
Buttons for list filters and a Search Bar are available to help sort and manage Issues as the project progresses.
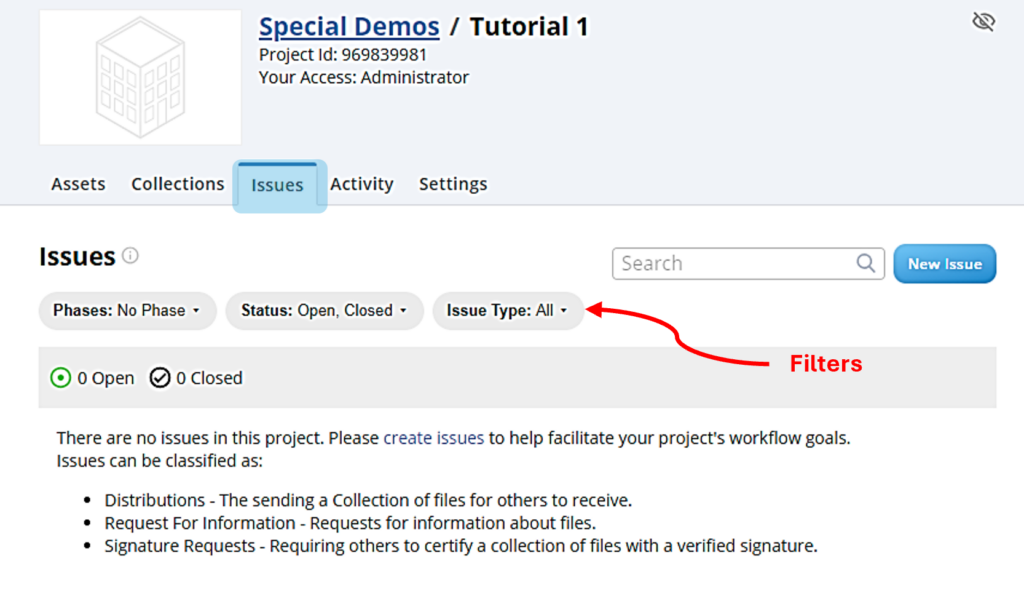
The Issue Dashboard
Issue Identification
To collaborate with Issues, select the +New Issue button. A dialog box will appear with the following:
- Issue Type – Select the type of workflow. There are four (4) basic types – Distributions, Acknowledgement of Receipt, RFI- Request for Information, and Signature. Distribution’s are the most common type.
- Title – This is a required field to define the title of the Issue. To effectively collaborate with Issues, create a title that provides a clear description of the subject matter.
- Phase – If Phases are active, this drop down will display. Pick the appropriate phase of the project for the content of the Issue. If you have not yet set up Phases, this dialogue box will not display, but you can add Phases later and assign individual issues to the appropriate phase once you create them.
- Comment: This sets the context to encourage team members to collaborate with Issues. An email notification to the participants will include these notes or instructions.
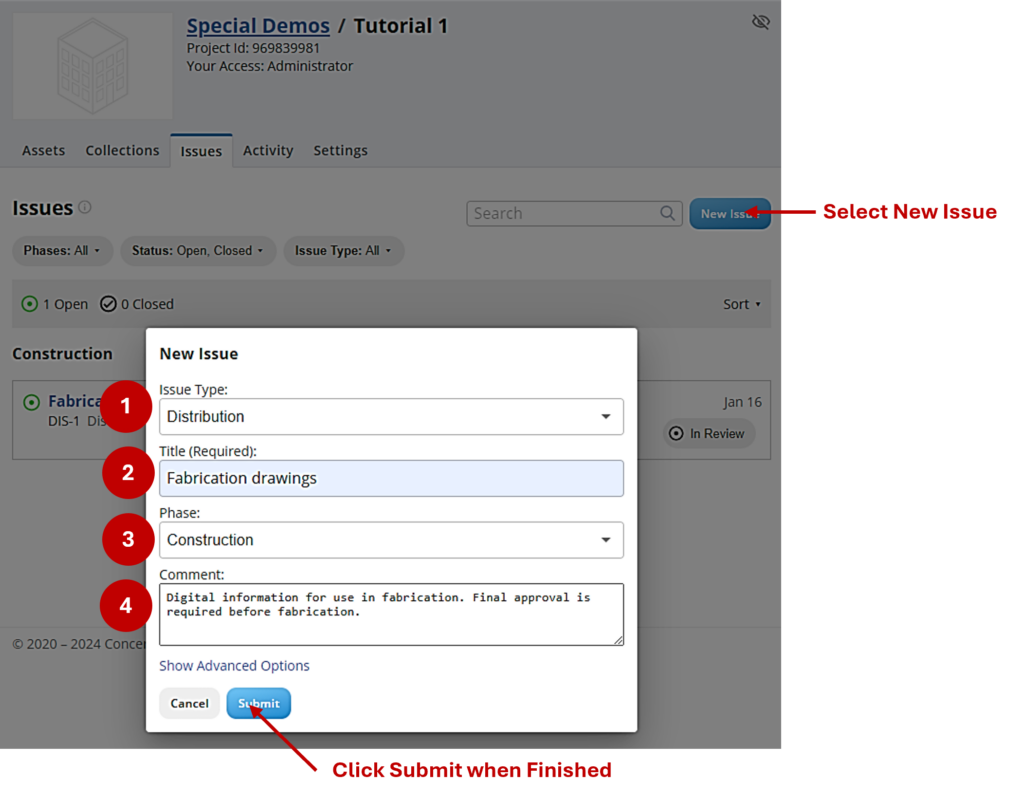
Crafting an Effective Issue to Collaborate on.
There are additional options available if you wish to add more information specific to your project or organization. Click on the “Show Advanced Options” text to add the following:
- External Reference Number – By default, Concert will automatically assign a reference number to classify the Issue and the workflow. If your organization has a custom numbering structure you may substitute that here.
- Response Required (Optional) – For some Issues, the author will want the recipients to provide a response or feedback within a specific time frame. This is a deadline for all participants informing them of the Issue deadline.
Select the Submit button to continue. You have now created the Issue.
Constructing Effective Issues to Collaborate
Components of an Issue
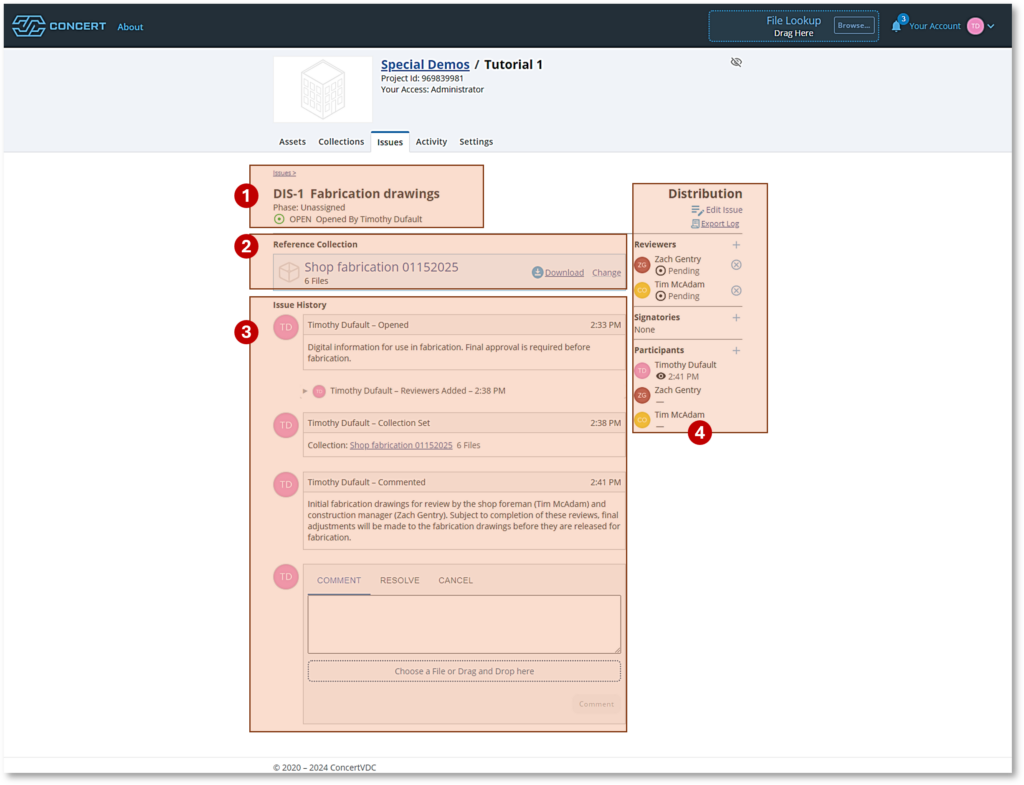
How an Issue can Support Collaboration
-
Issue Header
Essential information to collaborate with an Issue – its purpose, and the timeline (if any). Each Issue has a unique reference number based on the type of Issue (DIS for Distribution, ACK for Acknowledgement of Receipt, RFI for Request for Information, or SIG for Signature) along with a sequential number as an identifier. If you create an External Reference Number, this will be the identifier. If you need to change any information here, users with the appropriate permissions can click on the “Edit Issue” at the right hand side of this box.
-
Reference Collection
This is the link to the Collection of Assets (files) that are relevant to the topic of this Issue. Every Issue must have a reference collection attached. If you select a existing Collection, this will reference that Collections name. You can create a unique Collection for this Issue and it will automatically have the same name as the Issue reference number.
-
Issue History
This is a record of all comments, direction, authorization, and discussion relative to this Issue. This captures all the questions and commentary and preserves it in the context of the Issue for future reference. This eliminates the confusion and disconnect typical with traditional email.
-
Participant Types
The author of the Issue establishes, while creating it, the responsibilities and expectations of each participant in the topic. There are three general responsibilities in every Participant:
-
- Reviewers – Recipients who will perform an additional duty of reviewing the Reference Collection and to provide feedback as requested or required by the author. Reviewers must to complete their review and acknowledge their approval to close an Issue. Additionally, Reviewers must complete this process prior to the due date.
- Signatories – Recipients who must apply a Digital Signature to certify or sign-off on the Reference Collection. This might be design professionals signing under their license, but it is not exclusively for this purpose.
- Participants – Recipients included for information purposes only. Participants can comment in the Issue and can attach other digital files they believe are important to the discussion, but may not have any official responsibility relative to the Reference Collection reviews, or approvals
Requirements for every Issue
The Participants list will show all the names of those included in the Issue, including those identified as Reviewers and Signatories. The Participants column also displays a date and/or timestamp of when each invited team member last visited the Issue. If the space below the Participants name shows only a “-“, then that person has not yet visited the Issue or reviewed any of the attached information.
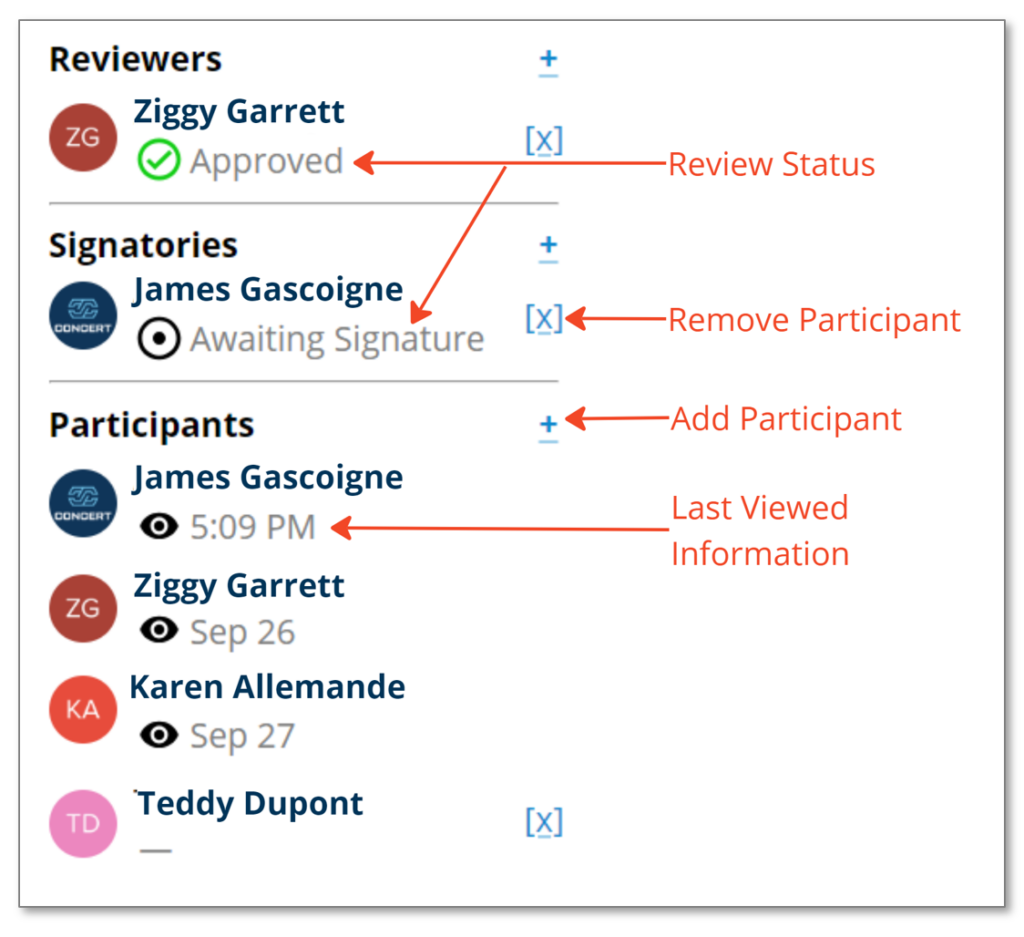
Identifying the Key Collaborators
To issue information, you must meet the following two criteria:
- You attach a Reference Collection to the Issue
- You’ve included one or more Participants. Reviewers and Signatories are optional.
Adding Team Members
To effectively collaborate with Issues, add team members by selecting the “+” button next to the desired category (Participant, Reviewer, or Signatory). Selecting the + will bring up a dialog box that provides the option to select a Project User to add them to the list. To be part of an Issue, Participants must already be on the Project as Project Users. (See Here for the process of setting up Project Users.) Selecting Users as Reviewers or Signatories follows the same process.
Once you add Participants, within the next 10 minutes they will receive email notification about the Issue and their accountability.
Changes to the Reference Collection will trigger a new notification to all Participants in the Issue
Reviewing an Issue
Team members listed as a Reviewer the Comment box will see a green Review tab in the comment box. Selecting the tab will allow the Reviewer to Approve or Reject feedback by selecting one of those buttons. Reviewers must provide commentary to give context to their approval or rejection to submit their response. Only after all Reviewers have completed their review can the Participant(s) identified as Signatories sign the Reference Collection.
Resolving an Open Issue
Closing the Loop
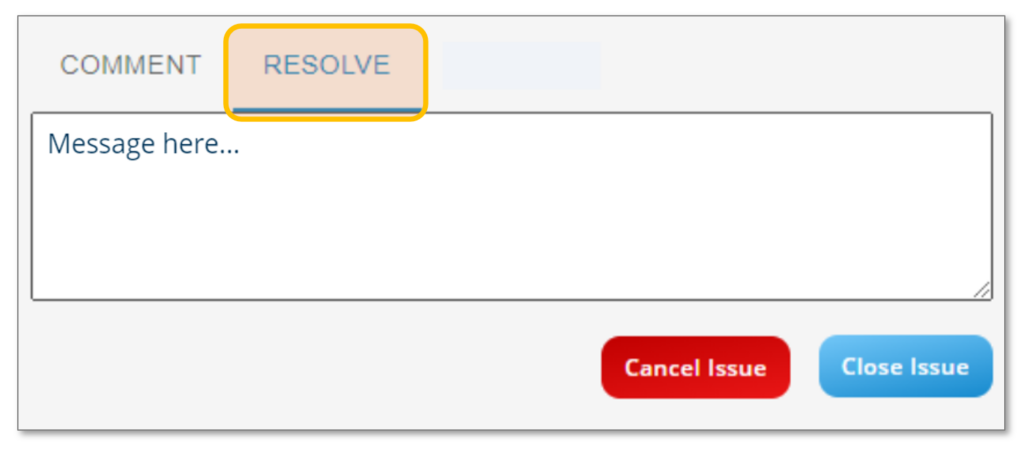
There are two ways to Resolve an Issue: Close or Cancel. This function is accessible as a tab on the Comment box at the bottom of the page to the person who created the Issue or a User with appropriate Administrative rights.
- To cancel the Issue, select the Resolve tab and then select the Cancel button (in red). You can leave a comment if appropriate. The status of the Issue will change to Cancelled and it will no longer show up on the Issues dashboard (under the default filtering setting). To see all canceled Issues, click on the “Status” filter and check the box to display cancelled Issues. This is a temporary setting and will default to unchecked when you move away from this view.
- To close an Issue, select the Resolve tab and then select the Close Issue button (in blue). You can leave a comment if appropriate. The status of the Issue will change to Closed and it will display as Closed on the Issue dashboard. All Participants in the Issue will receive notification of the change. An Issue cannot close if there are incomplete or open reviews.
This process is not permanent. You can reopen Closed or Canceled Issues at any time.
The Important Facts about the Issue History
Using the Issue History section to collaborate with Issues is a dynamic communication tool. Using the Comment box at the bottom of the page, all Participants can provide comments, engage in a conversation, and, if needed, drag-and-drop new files to supplement the information and discussion.
The Issue History also provides context to the general discussion, capturing in one place what each Participant shares with the group. This promotes real collaboration as all participants in the Issue can review and understand all the comments shared without having to search through long email chains that may or may not have included them.
The Issue History also provides a record of not only the decisions made throughout the process, but also of the journey to that decision and the information used to inform that decision. As team members come and go from the project, relevant discussions build continuity and are available to new members to read and digest.
